Uno Platform 習作 その2
ユーザー一覧画面の実装
ソリューションエクスプローラーから「xxx.Shared」にある「ListPage.xaml」を右クリックし「デザイナーの表示」を選択し、開かれたデザイナー下段にある「XAML」に表示されているコードを以下のように変更します。
<Page
    x:Class="UnoApp.Shared.ListPage"
    xmlns="http://schemas.microsoft.com/winfx/2006/xaml/presentation"
    xmlns:x="http://schemas.microsoft.com/winfx/2006/xaml"
    xmlns:local="using:UnoApp.Shared"
    xmlns:d="http://schemas.microsoft.com/expression/blend/2008"
    xmlns:mc="http://schemas.openxmlformats.org/markup-compatibility/2006"
    mc:Ignorable="d"
    >

    <Grid Background="{ThemeResource ApplicationPageBackgroundThemeBrush}">

        <Grid.ColumnDefinitions>
            <ColumnDefinition Width="1*" />
            <ColumnDefinition Width="100" />
        </Grid.ColumnDefinitions>
        <Grid.RowDefinitions>
            <RowDefinition Height="50"/>
            <RowDefinition Height="1*"/>
        </Grid.RowDefinitions>

        <Grid Background="WhiteSmoke" Grid.Row="0" Grid.Column="0">
             <TextBlock Text="User List" FontSize="32" Margin="20,0,0,0" VerticalAlignment="Center" />
        </Grid>

        <Grid Background="WhiteSmoke" Grid.Row="0" Grid.Column="1">
            <Button Content="戻る" VerticalAlignment="Center" HorizontalAlignment="Center" Width="100" Height="50" Click="Back_Click"/>
        </Grid>

        <ScrollViewer Margin="0,0,0,0" Grid.Row="1" Grid.ColumnSpan="2">
            <StackPanel>
                <ListView x:Name="listView" Height="200" Background="NavajoWhite" ItemsSource="{Binding}"/>
            </StackPanel>
        </ScrollViewer>

    </Grid>

</Page>
- 画面を Grid で分割し、上部は背景色を指定する事でメニューバーっぽく見せています。
- メニューバー右端にはクリックで「Back_Click」が行われる「戻る」ボタンを配置しています。
- Grid下段には ScrollViewer を配置し、その中に配置した ListView にユーザー一覧を表示させます。
ユーザー一覧画面のコードビハインド
「xxx.Shared」にある「ListPage.xaml.cs」を選択し、コードを以下のように変更します。
プラットフォーム毎の分岐等は前回の「MainPage.xaml.cs」と同じですが、URLの一部に変更があります。
using System;
using System.Collections.Generic;
using System.IO;
using System.Linq;
using System.Runtime.InteropServices.WindowsRuntime;
using Windows.Foundation;
using Windows.Foundation.Collections;
using Windows.UI.Popups;
using Windows.UI.Xaml;
using Windows.UI.Xaml.Controls;
using Windows.UI.Xaml.Controls.Primitives;
using Windows.UI.Xaml.Data;
using Windows.UI.Xaml.Input;
using Windows.UI.Xaml.Media;
using Windows.UI.Xaml.Navigation;
using Newtonsoft.Json;

// The Blank Page item template is documented at https://go.microsoft.com/fwlink/?LinkId=234238

namespace UnoApp.Shared
{
    /// <summary>
    /// An empty page that can be used on its own or navigated to within a Frame.
    /// </summary>
    public sealed partial class ListPage : Page
    {
        public ListPage()
        {
            this.InitializeComponent();
            soap();
        }

        private async void soap()
        {
            List<string> lst = new List<string>();
            string endpoint = "https://localhost:44340/api/Sample?lst=true";

#if __WASM__
            var handler = new Uno.UI.Wasm.WasmHttpHandler();
#elif __ANDROID__
            endpoint = "https://10.0.2.2:44340/api/Sample?lst=true";
            var handler = new System.Net.Http.HttpClientHandler();
            handler.ServerCertificateCustomValidationCallback = (message, cert, chain, sslPlicyErrors) => true;
#elif __IOS__
            endpoint = "https://192.168.11.11:44340/api/Sample?lst=true";
            var handler = new System.Net.Http.HttpClientHandler();
            handler.ServerCertificateCustomValidationCallback = (message, cert, chain, sslPlicyErrors) => true;
#else
            var handler = new System.Net.Http.HttpClientHandler();
            handler.ServerCertificateCustomValidationCallback = (message, cert, chain, sslPlicyErrors) => true;
#endif

            try
            {
                System.Net.Http.HttpClient client = new System.Net.Http.HttpClient(handler);
                System.Net.Http.HttpResponseMessage result = await client.GetAsync(new Uri(endpoint));

                string json = await result.Content.ReadAsStringAsync();

                //jsonを解析して結果を取得する
                List<Users> usr = new List<Users>();
                usr = JsonConvert.DeserializeObject<List<Users>>(json);

                for (int i = 0; i < usr.Count; i++)
                {
                    string id = usr[i].UserId.ToString().Trim();
                    string us = usr[i].Name.ToString().Trim();
                    lst.Add(us);
                }

                listView.DataContext = lst;
            }
            catch (Exception ex)
            {
                var dialog = new MessageDialog($"エラーが発生しました:" + ex.Message.ToString());
                await dialog.ShowAsync();
            }
        }

        private void Back_Click(object sender, RoutedEventArgs e)
        {
            this.Frame.GoBack();
        }
    }
}
通信結果のjsonを解析し、listView.DataContextにセットします。
(「listView」はXAMLで記載したリストビューのNameです)
またBack_Clickでは前画面に戻る処理を実装していますが、GoBackするだけで戻ることができます。
動作確認
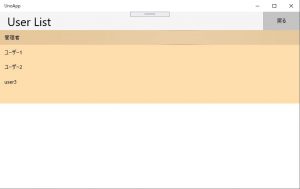
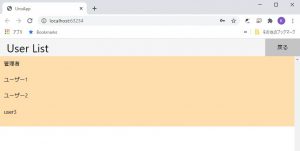
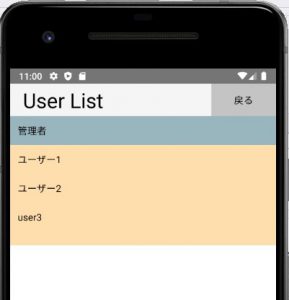
任意のプラットフォームで実行し、「User ID」「Password」を入力、「Login」を押下すると、以下のような画面が表示されるはずです(iOSは取り忘れ)。
| Windows | Web | Android |
 |
 |
 |
WindowsとWebはリスト最上段にマウスをあてた(Hover)状態、Androidはリスト最上段をタップした状態でのスクリーンショットです。
終わりに
今回のような簡易な画面ではなく、本格的なスマートフォン向け画面を作ろうとするとXAMLのテクニックを学ぶ必要があったりはしますが、(全てではないにせよ)主たる処理をプラットフォームに左右されず作れる利点はやはり大きいと思います。
前々回で説明した通り、MacがあればiOSアプリも含めすべてフリーで開発できますので、トライしてみてはいかがでしょうか。
- 当ページの人物画像はNIGAOE MAKERで作成しました。


